The most popular cloud platform is Microsoft Azure. As a result, many organizations are turning to it to create high-quality, scalable enterprise applications. However, integrating such a complex platform throughout your organization is not simple.
So, here’s a tutorial on how to benefit from the Azure Web App Service in the best way possible. To continue with this post, I’m assuming you already have a Microsoft Azure account. If you don’t, you can read this article for a step-by-step azure app guide on how to create an “Azure Free Account” that will walk you through the process of creating an Azure account.
What is IAAS,PAAS, & SAAS?
These are the basic foundation of any cloud platform. If you want to learn about the cloud platform then you should have a clear knowledge and idea about these three terms.
What is Infrastructure as a service (IaaS)?
IAAS is used for renting hardware as services like Servers and storage, Networking firewalls/security, and Datacenter physical plant/building from the cloud providers with Pay As you go subscription model.

What is Platform as a service (PaaS)?
PaaS allows you to avoid the expense and complexity of buying and managing software licenses, the underlying application infrastructure, and middleware, container orchestrators such as Kubernetes or the development tools, and other resources.
You manage the applications and services you develop and the cloud service provider typically manages everything else.

What is Software as a service (SaaS)?
SaaS provides a complete software solution that you purchase on a pay-as-you-go basis from a cloud service provider.
You rent the use of an app for your organization and your users connect to it over the Internet, usually with a web browser. All of the underlying infrastructure, middleware, app software, and app data are located in the service provider’s data center.

What is Microsoft Azure Web App/Azure App?
Azure web app services let you quickly build, deploy, and scale enterprise-grade web, mobile, and API apps running on any platform. It falls under the platform as a service or PAAS.

What is the Azure Resource Group?
The Azure Resource Group is used in the Microsoft Azure portal just to set the logical limits between your resources. Or, maintaining all related resources within a single group.
Create a Web App using Azure Portal
So, Let’s Jump Into the portal and start creating our first Azure Web App.
Login to portal.azure.com


Provide all the information requested in the section
- Subscription: Since I use the free azure account. So, to me, the subscription is just one, Free Trial. It could be different for you though. You may get multiple Azure subscriptions. So choose the one that suits you.
- Resource Group: If you already have a resource group on your portal just pick the resource group that is appropriate. Another way you can create a new resource group is by clicking the Create new button.

So, I created the resource group Demo-WebApp. That holds all of the web apps. Click on the ok and a newly created group will be selected for you.

- Name: The name of the Azure app/Web App should be exclusive. So, Please offer a unique name that can be used.
- Publish: We are going to publish the code directly to this Web App. So, select the Code as Publish option.
- RunTimeStack: Pick the appropriate version of your targeted framework. In our case, it is .Net Core 3.1. Microsoft provides many other options like Java, Python, PHP & Node.Js as well.

Be careful when selecting options in this section. Since, whatever OS & Region you pick here, the cost will be calculated based on that.
- Operating System: Pick the operating system for your application. We have selected Linux as our OS. Since Microsoft .Net core no longer has platform dependency.
- Region: In this section, you can pick the region where your app will be hosted. Select the region nearby to your audience. I have selected South India as Region.
On the basis of these two selections, Azure will create the App Service Plan for you. With the basic needs of your operating system to run the targeted application. However, you can change the size of the CPU or Ram if required. Just click on the Change Size link & you will find a lot more options to customize the machine configuration.

Microsoft always does things that are user-friendly. So, you can see it on the screen here too. With the pricing details, you can clearly see which option to pick. After you have finished configuring the client, press Apply.
Click on Review+Create Button.
Clicking on this button takes you to the review screen, Where you can review all the configurations selected by you. Also, the portal will validate the configurations selected by you. In my case, I end up getting errors in the review and creating a section.

As per the error description. The selected region is not allowed for a free subscription. So, let’s pick the different Regions and try again. I am going to select Central US and give it a try again.

If you don’t see any error in the page means. All set to go, Just click on the Create button and finish the Creation of your first Web App in the Azure portal.
After clicking on the Create button it will take a few seconds to spin up your web app/Azure App.
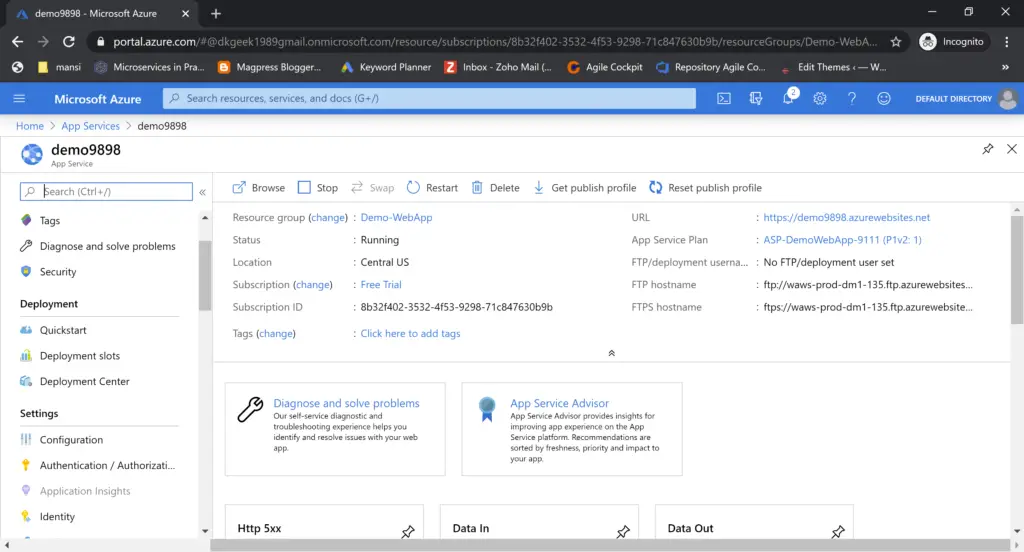
Now, Again navigate to the App Services page. You should see the newly created web app, with the status as Running.

Click on the listed App to navigate to the Web App. On the app page, you should be able to find the URL, Ftp Details, and a lot more things. Which you can explore one by one. URL is the one where you can access your application.

After clicking on the URL, you should be able to see the page with the default template.

We are done with creating a web App. Now lets try to see the different options available in the WebApp section. That is frequently being used by developers.
Components of the Web App/App Service
Overview
This section gives you an overview of the application. you can see the status, location, URL, Region, etc.

You can also start, Restart, or Delete the WebApp using this section. Along with these it also gives you the data related to your application. like a number of requests, Average Request time out & if there are any 500 errors in your application.
Deployment Center
In this section, you can configure the CI/CD pipelines for your Web Apps. Using different-2 SCM providers like Git, Bitbucket, or AzureRepos. We are going to cover this section in detail in the upcoming articles.

Configuration
In the configuration section of azure. You will find almost everything related to the configuration.
Application settings
You can use this page to keep all your application settings or key-value pair. Most of the applications use the web. config/ApplicationConfig or in the case of java it can be I think property file.

Anything which you don’t want to hardcode and pick up from the configuration. you can use this setting.
eg: I want to pick my application title from the configuration not from the Db or anywhere in the application hardcoded value.
Just click on the New Application Settings and provide the Key, Value pair details.

By default, all the values are hidden, Just on the column header to see the value for the key.
General Settings
This section gives you privileges to change the configuration related to your app environment/runtime & a few other settings.

Also, you can specify whether you are allowed to upload by FTP or not. A version of HTTP, Websocket status & a few more. You can enable or disable based on your requirements.
Authentication/Authorization
Authentication is the basic need of any secure application. Azure provides multiple choices to pick the one which you want to configure. As you can in the given screenshot, you can configure Facebook, Google, and Microsoft as External authentication providers.

Custom Domain in Azure App
If you already have a domain name that you want to assign to your web app.

Open the custom domain section and add a custom domain. Aure will validate the domain name before it maps it to the web App. Don’t forget to create a CName entry in your domain name provider configuration. Before you try to map the domain with Azure Web App.
TLS/SSL settings
In the TLS/SSL settings section of Azure, you can configure almost everything related to the SSL/TLS certificate. If you don’t have a certificate, buy from here.
you can also upload the private and public key certificates and assign them to your domain. It also allows you to pick the specific version of TLS 1.0/1.1/1.2.

Cross-origin resource sharing(CORS)
Cors is a very familiar word with developers. I still remember the time, had to struggle a lot to make a call to different domains using javascript.

But, with Windows Azure web app services, it has become so easy to configure the origins for your application. You just have to follow the instructions given by the Azure portal. Add the domain which you want to allow.
Metrics
As the name suggests, the Metrics section can be used to get the reports of your application with different-2 metrics. Like Requests Count, Avg Response Time, Number of connections & also based on HTTP codes 200,300,400 & 500.

As you can see in the above sample metrics report. It shows the number of requests with status code 200.
Log stream shows you the console log of each request that hits your website. Sometimes, log steam can be very useful to find the error or debug the application.

I know there are many options that are available in the Azure Web App services. But, I have just focused on the frequently used ones.
Conclusion
I attempted to explain at least the basic concept of each component used in the Microsoft Azure Web App. Also, we discovered that not all regions are permitted under Azure’s free subscription tier.
What is Metrix in Azure Web App?
As the name suggests, the Metrics section can be used to get the reports of your application with different-2 metrics. Like Requests Count, Avg Response Time, Number of connections & also based on HTTP codes 200,300,400 & 500.
What is Deployment Center in Azure Web App?
In the Deployment Center, you can configure the CI/CD pipelines for your Web Apps. Using different-2 SCM providers like Git, Bitbucket, or AzureRepos. We are going to cover this section in detail in the upcoming articles.


Comments are closed.