If you are looking for a holistic guide to understanding all about service Bus in Azure, you have come to the right place.
Azure Service Bus is a reliable cloud messaging as a service (MaaS) and simple hybrid integration platform.
A service bus is used to connect any applications, devices, and services to any other applications or services running in the cloud. Hence, it can be considered a messaging backbone for any cloud-based application across any device.
In this article you will come across every important topic you must know about the azure service bus along with a practical hands-on demo on how to work with and create azure buses to make everything clear for you.
Azure Service Bus Overview
Messages are used to communicate data between different apps and services. A message is a container that holds data and is embellished with metadata. The data can be any type of information, including structured data stored in popular formats like JSON, XML, Apache Avro, and Plain Text.
If you’ve used other message brokers, such as Apache ActiveMQ, the Service Bus idea will be familiar. You won’t have to worry about any of the following procedures because Service Bus is a platform-as-a-service solution. Azure will take care of the things for you.
- concerns about hardware problems
- Keeping operating systems and products up to date
- Logging and disc space management
- Dealing with backups
- Switching to a backup machine
What are Azure Service Bus tiers?
There are three tiers of Azure Service Bus.
- Basic: Because it is so inexpensive ($0.05 per million operations), Basic is ideal for hobby projects or extremely tiny loads.
- Standard: It starts at $0.0135 per hour and includes the ability to execute publish/subscribe scenarios, transactions, and sessions.
- Premium: It starts at just under $1 per hour and allows for resource isolation and redundancy.
Azure Service Bus Queue
The queue is a function that allows users to send and receive messages. Messages are stored until the final recipient program allows accepting and processing them.
On arrival, messages in queues are organized and the time is noted. If the namespace is zone-enabled, the message is always held durably in triple-redundant storage once it has been accepted by the broker. After messages have been accepted by the client, Service Bus never keeps them in memory or volatile storage.
Even if the recipient is temporarily unavailable, sent messages are saved and delivered later upon request, also known as pull mode. Another benefit of employing queues is that the sender and receiver can operate at different frequencies. Even though messages might be transmitted frequently, the recipient may opt to process them at its own pace to avoid crashes.
Azure Service Bus Topics
Topics can also be used to transmit messages. Topics are useful in publishing/subscribe contexts, where a queue is commonly utilized for point-to-point communication.

Multiple, separate subscriptions can be assigned to a subject and, from the receiver’s viewpoint, act similarly to queues. A subscriber to a topic can receive any message sent to that topic. Named entities are what subscriptions are referred to as. Subscriptions are persistent by default. However, they can also be programmed to expire and be immediately deleted. Using the Java Message Service (JMS) API, Service Bus Premium also allows you to create dynamic subscriptions that last for the session’s duration.
On a subscription, you can set rules. A subscription rule has a filter that specifies a criterion for a message to be copied into the subscription and an optional action that modifies message information. See Topic filters and actions for additional details. This feature comes in handy in the following situations:
You don’t want to get all messages sent to a topic as part of a subscription. When messages pass via a subscription, you can add more metadata to them.
When to use Azure Service Bus Queue vs Topic
Use Queues if your apps will communicate with each other in a one-to-one format and your messages must be delivered at any cost. For example, suppose you receive a large number of orders that all need to be handled, here queues are a very useful feature for you.
Use Topics if you need to send messages to a large number of systems that can respond to the same message in different ways. It can be used to deliver alerts via a variety of services (for example, one service can send SMS messages, while another sends emails, and so on). Topics are ideal for building a microservice infrastructure that allows multiple services to react to a single event.
Namespaces
A namespace contains all messaging components. Because a single namespace can hold several queues and topics, namespaces are commonly used as application containers.
In the vocabulary of other brokers, a namespace can be likened to a server, but the ideas are not directly identical. A Service Bus namespace is a capacity slice of a massive cluster of dozens of all-active virtual machines you control. It can span up to three Azure availability zones if desired. As a result, you receive all of the benefits of running the message broker at a massive scale in terms of availability and resilience. You also don’t have to be concerned with underlying complexities. Serverless messaging is what Service Bus is all about.
Event Hubs
Event Hubs, comparable to Service Bus messaging, will handle large-scale event stream processing. It’s similar in that it allows you to send messages through Advanced Message Queuing Protocol.
The key difference between Event Hubs and Azure Service Bus messaging is that, unlike Azure Service Bus, a glance lock message cannot be deleted. Instead, Microsoft used a stream reader to provide a high level of scalability.
Above all, users can process the streamed data and use it for their own purposes.
Example case:
Under the hood, Microsoft employs Event Hub for application insights and API administration.
As part of a car-sharing plan in Paris, a business named “Autolib” uses Event Hub, which is part of the Microsoft IoT stack, to communicate information between devices and automobiles.
Multiple senders’ telemetry data is stored in the message stream in Event Hub. The message cannot be removed from the stream by the receiver. Instead, they are only removed when their retention time expires. A consumer group can access messages from any stream.
Relays
Unidirectional messaging is provided through Queues and Topics. Azure’s Relay messaging solution allows for bidirectional communication. There is no clear relationship between sender and receiver in Queues or Topics. In the case of relays, each application will establish an outward TCP connection to Service Bus.
We don’t need to explicitly construct relays. When the application connects to the Service Bus, a relay is generated. The Relay technique is designed to connect apps regardless of their deployment environment. Some applications are hosted on-premises in various data centers. Connecting various programs for communication is a difficult development and configuration effort. We may use Azure Service Bus Relays to offer direct connectivity across applications with minimal effort.
Why Use a Service Bus?
When you require a cloud-based solution to broker messages across different apps and eliminate coupling in your systems, Service Bus is ideal. Create a queue to receive messages that will be processed later (even if it’s only seconds later) using Service Bus.
- Handle peak loads in which a surge of messages may cause your processing program to slow down.
- Decouple apps so that their technologies and APIs can evolve as long as they agree on a message format for communicating with one another.
- Distribute a single message to a number of different applications.
- Message processing can be scaled out while keeping the order of the messages.
Compliance with standards and Protocols
Advanced Messaging Queuing Protocol 1.0, an open ISO/IEC standard, is the fundamental wire protocol for Service Bus. Customers can use it to create apps that work with Service Bus and on-premises brokers like ActiveMQ or RabbitMQ. If you want to create such an abstraction, the AMQP protocol guide has all the details you’ll need.
The Java message API is fully supported by Service Bus Premium. In addition, Service Bus Standard supports the JMS 1.1 queue subset. JMS is a popular message broker abstraction that works with a wide range of applications and frameworks, including the popular Spring framework. You only need to redesign the topology of queues and topics and update the client-provider requirements and configuration, to convert from other brokers to Azure Service Bus.
Advanced Feature Of Microsoft Azure Service Bus
Azure is one of the most advanced and robust platforms for solving all complex messaging problems that you may face while proceeding with your work. Microsoft Azure has some advanced features that may assist you while messaging. You may scroll down to know more.
Auto forwarding
Auto-forwarding is the most fantastic feature of Microsoft Azure. Auto-forwarding enables you to chain or connect the queues or subscription to another queue or the subscription in a similar namespace. Whenever you use this feature of Azure Bus, it enables you to move your message from one queue to the targeted topic or the queue.
Scheduling Of Messages
In Azure Bus, you can also create the scheduled messages, which means you can set the message/topics to the queue for the delayed processes. The unique feature of scheduled messages is that these messages will only appear at a defined time.
Batching
Batching is the feature of Microsoft Azure that is accessible for grouping the messages in a group or the group. It enables the clients to delay sending the message for a particular time. By chance, if any of the clients send the message in that particular time, then the message will be transferred to a single batch of the messages. It also enables the subscription client to accumulate multiple requests, single requests.
Auto Deleting
With this feature, you can select an idle interval after which a queue or topic subscription is automatically terminated using auto delete on idle. The duration must be at least 5 minutes.
Detection Of Duplicates
The detection of the duplicates in Azure Bus allows you to preserve the history of the messages that were sent to the queue for a specific interval of time. For that specific interval of time, no duplicate message will be stored under your queue or the topic. With this feature, the message delivery will be precisely done once over a specific time.
Step by Step Guide to Create Azure Service Bus
So now that we know the concepts of a service bus, let’s move on to how to set up a service bus.
Before moving on make sure you already have an Azure subscription or in case you don’t you can create a free account before you begin.
You get some initial free credits from azure which will be enough for getting familiar with the Microsoft Azure service bus also if you are a student you can always apply for Microsoft student Learn Ambassadors(MLSA) which will benefit you to get monthly free credits for 1 year.
Now Let’s understand the step-by-step process to set up the Microsoft Azure service bus.
Step1: Create a namespace in the Azure portal
After signing in to Azure, the first thing you need to do for setting up azure service bus messaging entities is to create a namespace with a name that will be totally unique across Azure. A scoping container is provided by the namespace for addressing Service Bus resources within your application.
For creating a namespace, follow the below steps:-
- After signing in to the Azure portal you will be redirected to the Azure dashboard from there Click on the left navigation pane of the portal—-> select + Create a resource

- Then you will be redirected to the “Create a resource “ page, from there select Integration on the left

- Next, select the Service Bus.
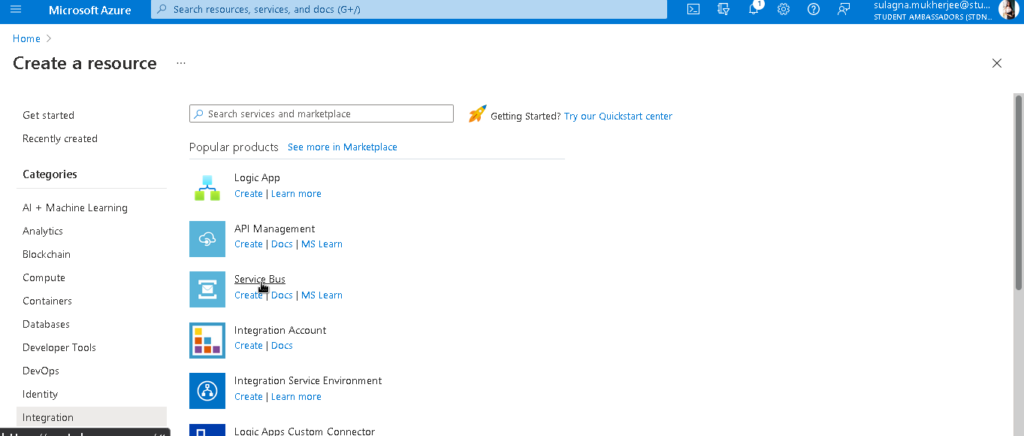
- Next, you will be redirected to “Create namespace” where you have to give the details as follows:-
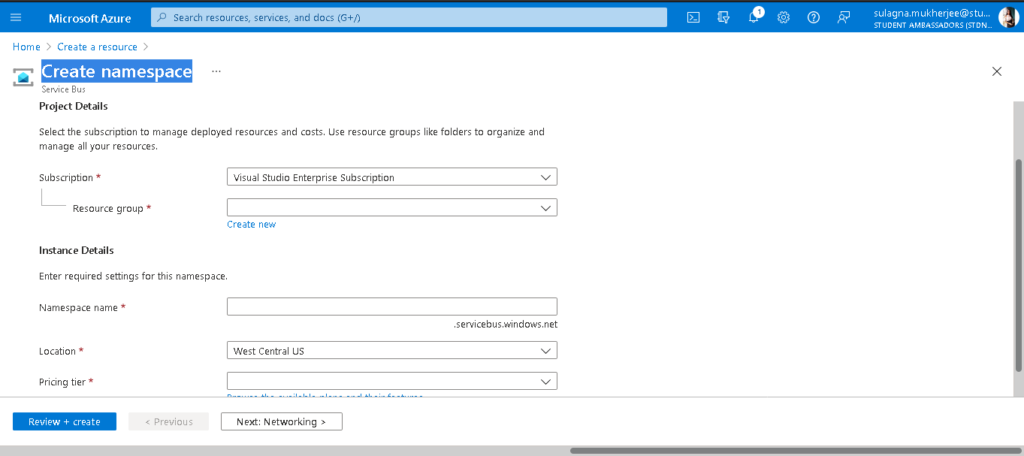
In the Create namespace page, fill the details according to the following instruction:
A. Subscription:- Choose any of the Azure subscriptions in which you want to create the namespace.
B. Resource group:- choose an existing resource group that you want to be used by the namespace, or if you don’t have an existing one then just create a new one, and the resource will be created for you which will be used by the service bus.
C. Name for the namespace:- The namespace name should follow the following naming conventions:
- The name must be unique across Azure because the system immediately checks whether the name is available or not. If the name is not unique it will throw an error showing “Namespace already exists. Enter a different name.”
- The name length must be at least 6 and at most 50 characters or else it will return an error showing ”The value must be between 6 and 50 characters long.”
- The namespace can contain only letters, numbers, and hyphens.
- The name must start with a letter and end with a letter or number.
- The name must not end with “-sb“ or “-mgmt“ or else it will show an error telling that it is invalid.
D. Location:- choose the region in which you want your namespace to be hosted.
E. Pricing tier:- select the pricing tier (Basic, Standard, or Premium) for the namespace. For now, select Standard.
For more information, you can check Service Bus Premium Messaging.
F. Review + create:- The system will create your namespace and enable it. You have to wait for a few minutes as the system will build the resources for your account which will take some time.
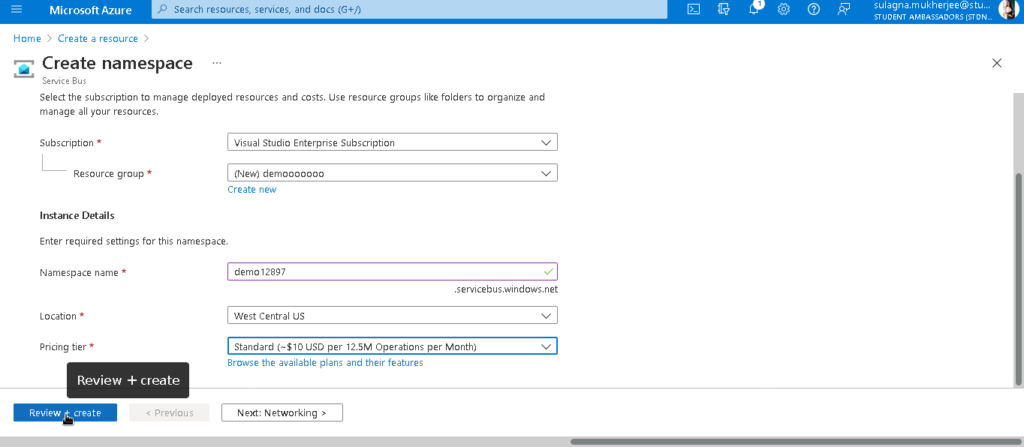
G. On the Review + create page, review settings, and select Create.
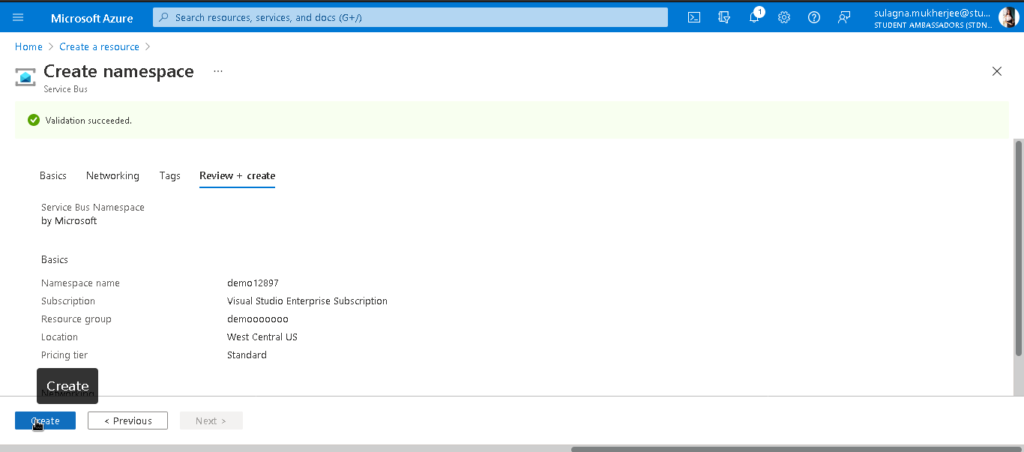
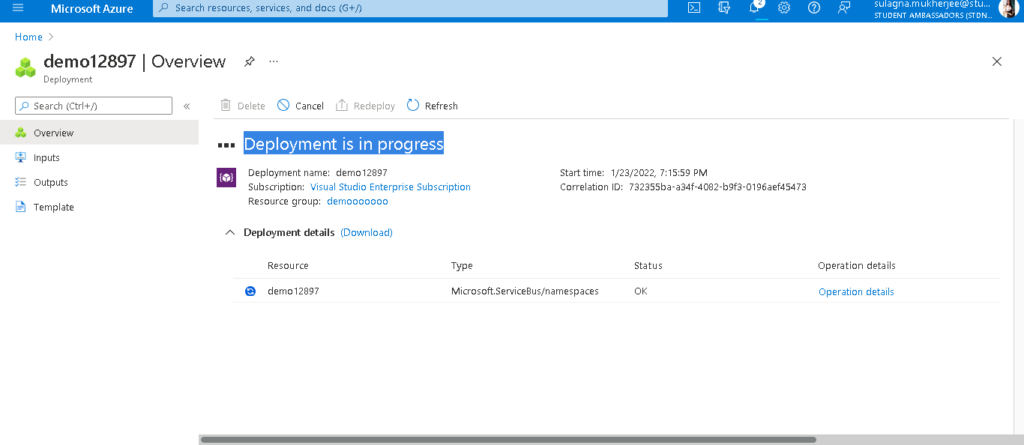
- Now wait for some minute till the Deployment is in progress
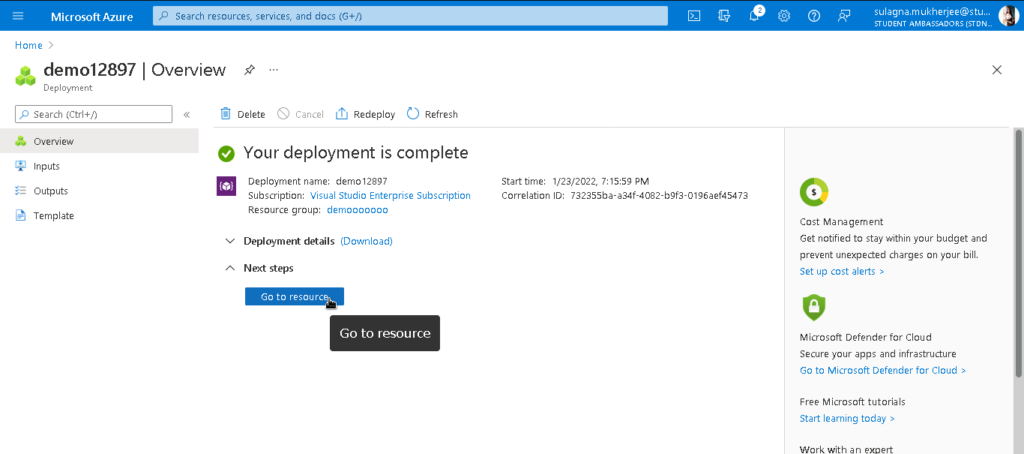
- Next, Select Go to a resource on the deployment page.
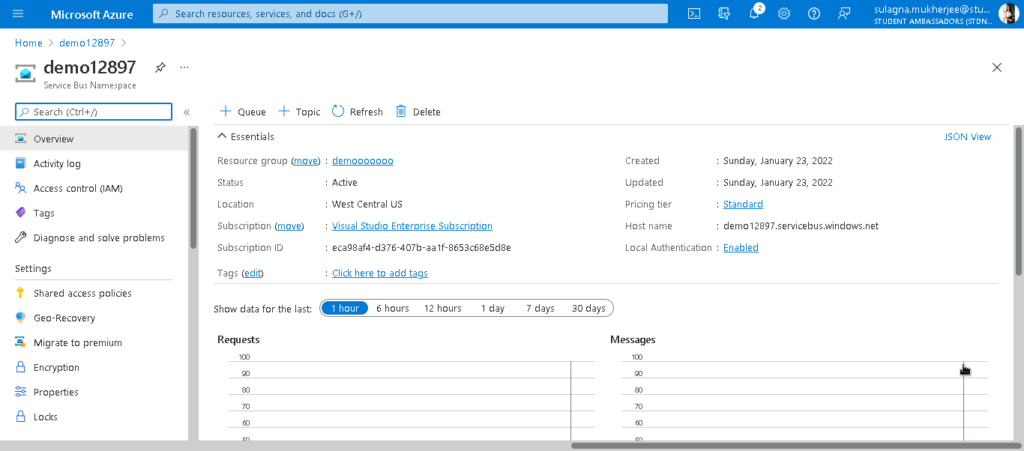
- Now you can see the home page for your service bus namespace.
Step2:- Get the connection string
An initial Shared Access Signature (SAS) policy with primary and secondary keys and primary and secondary connection strings of the namespace will be automatically generated on the Creation of a new namespace.
Check out Service Bus authentication and authorization for more information
For copying the primary connection string for your namespace, check the following steps:
- On the Service Bus Namespace page, select Shared access policies on the left pane.
- On the Shared access policies page, you have to select RootManageSharedAccessKey.
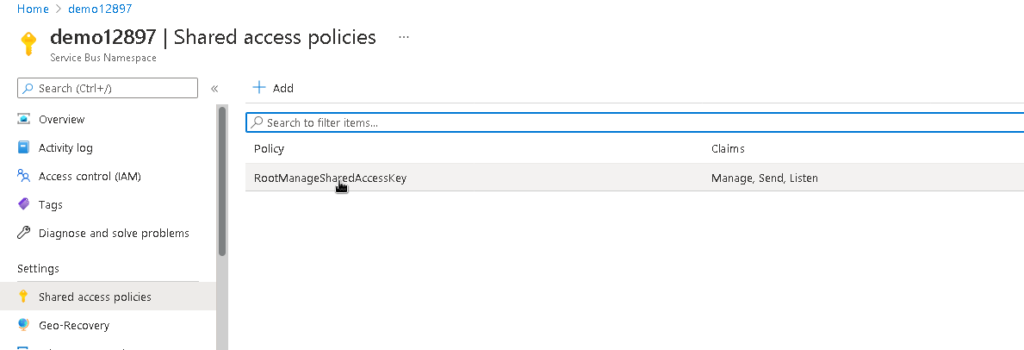
3. In the Policy: RootManageSharedAccessKey window, you have to click on the copy button next to Primary Connection String, for copying the connection string to your clipboard for later use. Paste this value into some other place for using it later on.
Example:-
Keep the Connection Strings safely it will be needed in the coding Purpose. For Example, if you use C#, You need to add the Connection Strings and queue name like the following:-
// connection string needed to  your Service Bus namespace
static string connectionString = "<NAMESPACE CONNECTION STRING>";
// name of your Service Bus queue
static string queueName = "<QUEUE NAME>";
Step 3:- Create a queue in the Azure portal
Now that we are done with the creation of the Service Bus namespace, let’s follow the following steps on how to create a queue in the Azure portal.
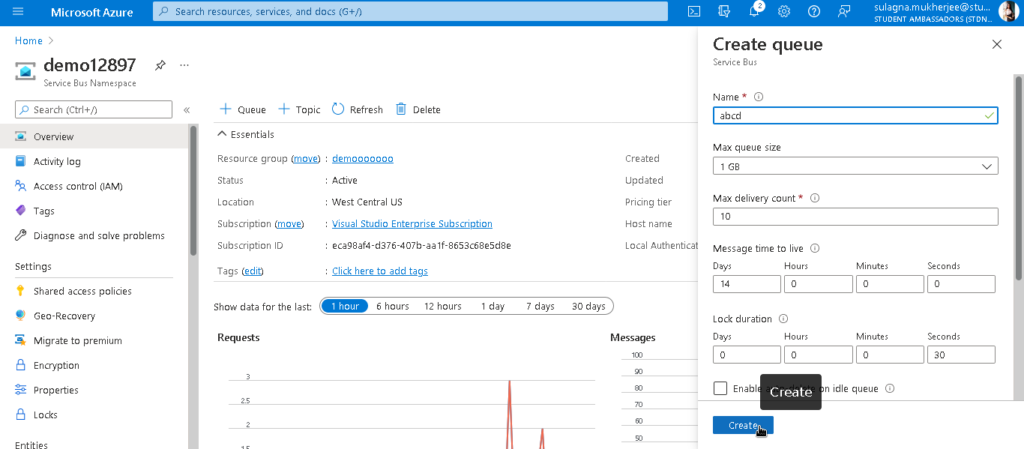
- Go back to the Service Bus Namespace page, select Queues from the top left—–> select + Queue on the toolbar.
- Next, on the Queues page, Enter the name of the queue, and you can leave other values with their defaults—-> Next, select Create.
Step 4:- Next steps
In our article, we showed you how to create a Service Bus namespace and a queue in the namespace, next you need to learn how to send/receive messages to/from the queue, for making that possible you can use different programming languages, for further guide you can check out the docs:-
Conclusion
One of the most excellent methods for decoupling your apps and safeguarding them against peak demands is Azure Service Bus. With the basic and standard tiers for most applications, you can keep it simple and affordable, and the libraries provided for numerous languages make it very straightforward to implement.
In today’s article, we gave a brief introduction to the azure service bus and other concepts related to the Azure service bus and at the end, we also showed how you can set up the azure service bus.
If this post piqued your interest in Azure Service Bus, I invite you to create an Azure account and test it out. Within an afternoon, you’ll have some functional code and a greater understanding of how simple it is to work with Service Bus.





Comments are closed.