In this article, we will come to know how to “Read Excel Files In Python“. For studying an Excel file, We will use Python’s PANDAS library.
Besides this, There are also some other ways by which we can read an Excel file in Python, Like by importing libraries openpyxl and xlwings.
We can also use Python to write datasheets.
Before directly shifting to how to read an Excel file, Let us take a little introduction to Pandas and how to install it in our system also will know why exactly we need to read or import an Excel file in Python.
Introduction to Pandas
Pandas is one of the most vital and useful libraries as compared to other libraries, It’s far very smooth to use and highly efficient.
It performs a very important role for data science engineers by using helping them with data analysis. It presents us 2D array i.e.tabular data in rows and columns, the Same as in Excel Sheets.

The above picture gives us a rough idea that how Pandas represent the Excel sheet’s output. Now, Let us see the procedure to install Pandas.
How to install Pandas
- Open the Command prompt.
- Use the command: pip install pandas, As soon as we give this command it will automatically install other Python library functions such as NumPy, pytz, python-dateutil, and six.
- Also while reading the Excel file we will use the extension .xlsx, So also install pip install openpyxl.
- If you are installing it in a Jupyter Notebook cell, Use it! pip install pandas instead of simply pip.

As the System used for the procedure has already Pandas library installed in it, Therefore, It is showing output as “Requirement already Satisfied”.
After following the above steps, Use the pip command again and then you will have the same image as above and now everything is ready for our work.
Features of pandas
- Makes it easy for us to work with big data.
- It provides us with a lot of functionalities of Python as Python has the simplest coding structure.
- Helps us to have specific data we require Like we can remove unnecessary details.
- Makes our work faster as Pandas is faster than Excel.

Read Excel files in Python Using Pandas Library in Python
Let’s start with the sample data preparation and try to read and write the excel sheet using pandas.
Data Preparation
We will use the tabular data provided below in images for testing manipulations using Pandas.
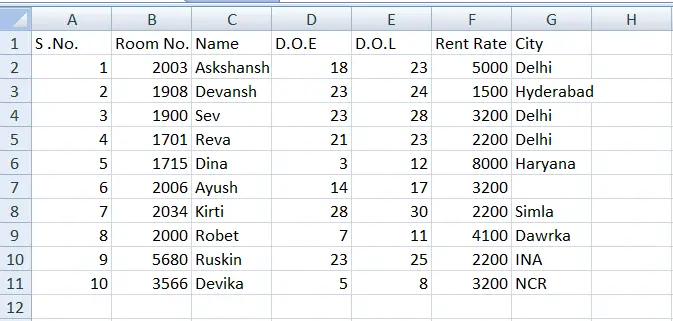
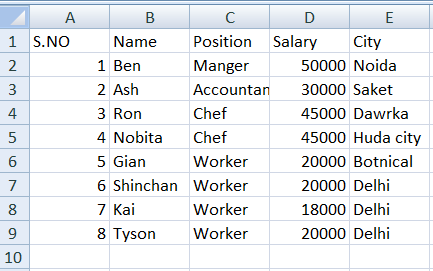
There are two Excel Spreadsheets, Of which one consists of information about Customers and the Other is about Staff.
Now we will see some manipulations on Excel sheets by using Pandas’ in-built functions.
Reading an Excel sheet
Excel sheets can simply be read by using the .read_excel() function. The code for the same is provided below.
Code:
# Below pan is alias name we can use any other name also
import pandas as pan

# Reading Excel sheet using in-built .read_excel() function
Excel_sheet = pan.read_excel(r'C:UsersACSDocumentsHotel.xlsx')

#Printing Excel sheet
print(Excel_sheet)
Output:
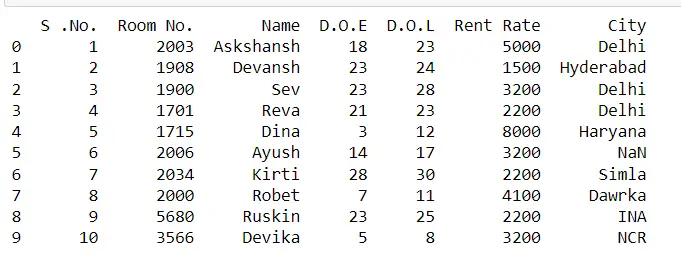
In the above code, we simply follow a few steps :
- First, we import the panda’s library feature in our program with an alias call or fake call that we can use in our program in place of Pandas over and over. import pandas as pan .
- For reading Excel files in our program we have to use the inbuilt function read_excel and syntax for using it as alias_name.read_excel i.e. pan.read_excel. in the above code.
- For storing data we use a variable “Excel_sheet”, Which is a data frame.
- Then, We copy the path of our Excel and paste it. Here in our program path is C:UsersACSDocumentshotel.xlsx.
- It will take automatically the first sheet of datasheets otherwise we can call a particular sheet by using the keyword sheet_name=” Sheet_name” or sheet_name=0,1,2,…,n. After that, Simply print the data frame.
Concatenate two Excel sheets Using Pandas
We can concatenate two sheets by using the in-built function .concate(A, B), Where A and B are two data frames and both store one sheet.
Merge Two Excel Sheets Belonging to the Same Excel Files
Code:
import pandas as pan

#Importing First sheet of Hotel.xlsx in Excel_sheet1 dataframe
Excel_sheet1 = pan.read_excel(r'C:UsersACSDocumentsHotel.xlsx',sheet_name=0)

#Importing Second sheet of Hotel.xlsx in Excel_sheet2 dataframe
Excel_sheet2 = pan.read_excel(r'C:UsersACSDocumentsHotel.xlsx',sheet_name=1)

#Printing Concatenate of both dataframes using in-built .concat() function
print(pan.concat([Excel_sheet1 ,Excel_sheet2]))
Output:
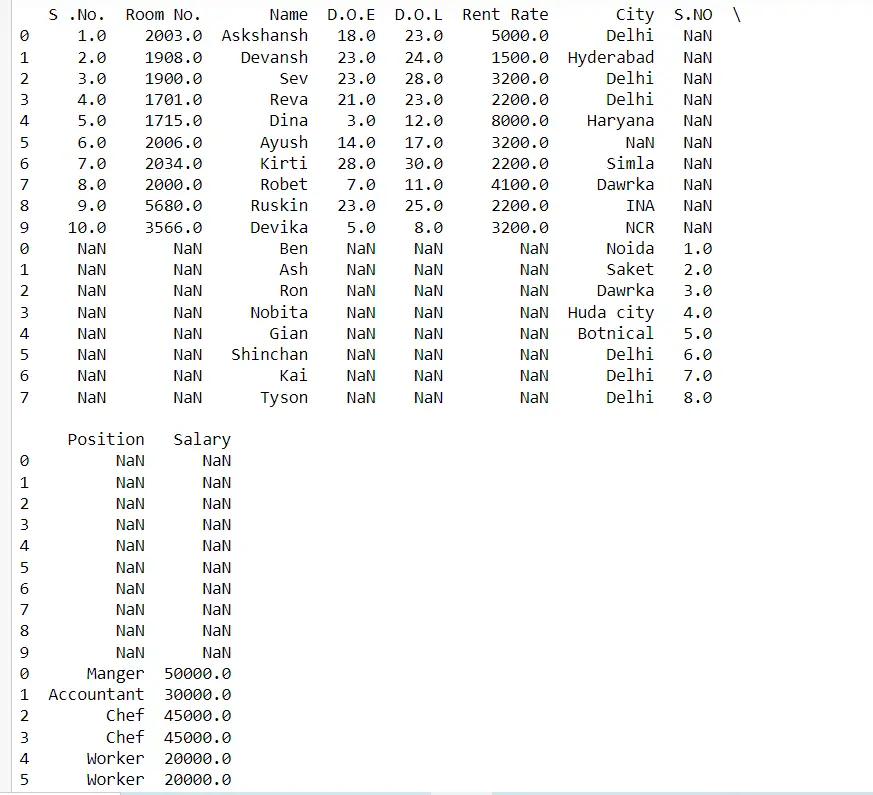
The above code is used to merge different sheets into one, In which both sheets belong to the same Excel file. Now we will see the concatenation of two sheets, Where both sheets will belong to different Excel Files. The code is provided below for the same.
Merge Two Excel Sheets Belong to Diffrent Excel Files
Sheets belonging to two different Excel files can also be merged with the same .concat() function.
Code:
import pandas as pan

#First sheet from Hotel.xlsx Excel file
Excel_sheet1 = pan.read_excel(r'C:UsersACSDocumentsHotel.xlsx',sheet_name=0)

#Second sheet from marks.xlsx Excel file
Excel_sheet2 = pan.read_excel(r'C:UsersACSDocumentsCopy of marks.xlsx',sheet_name=0)

#printing concatenation of both sheets using in-built .concat() function
print(pan.concat([Excel_sheet1 ,Excel_sheet2]))
Output:
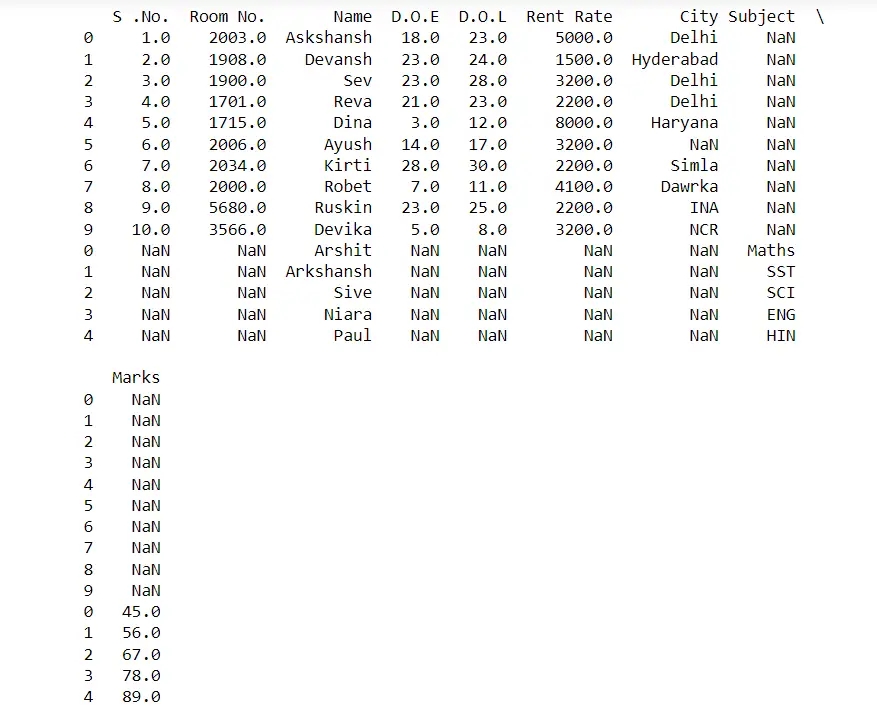
The output of different sheet concatenations in different excel files
In the above code, We are concatenating 2 sheets using Concat(). We can also merge the ‘n’ number of sheets using this function as well.
Then, the syntax to merge sheets will be as Concat([ df1,df2,….,dfn]), where passed arguments inside the function are data frames.
Skip Rows While Reading Excel Sheet
We can remove the Row number by using the keyword index_col=0, Which is predefined in Pandas.
It removes unnecessary Row numbers which are shown in the output. If we use syntax like index_col=1234……n then this will place that particular column in place of the first column.
Code:
import pandas as pan

Excel_sheet = pan.read_excel(r'C:UsersACSDocumentsHotel.xlsx',index_col=0)


print(Excel_sheet)
Output:
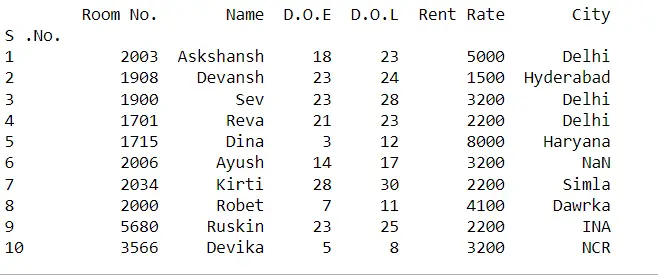
In the code above, We use index_col=0, Therefore, We are able to see Row numbers in the output, Let us change the value of the column in the code from 0 to 2 and see the difference in the output of both.
Code :
import pandas as pan

#Changing index_col's value to 2
Excel_sheet = pan.read_excel(r'C:UsersACSDocumentsHotel.xlsx',index_col=2)

#printing sheet
print(Excel_sheet)
Output:
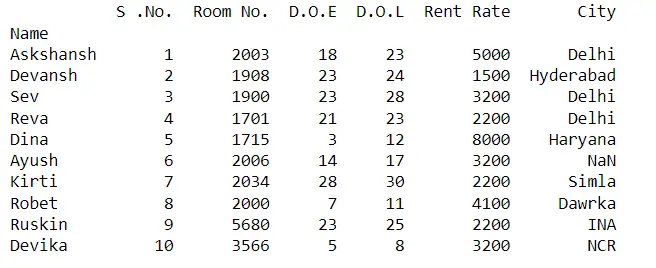
We see clearly in the output of both above codes that. The default column number of “Name” was 2 initially. When we use “index_col = 2”, Then “Name” column is placed in place of the first column.
Reading Selective Columns in Pandas:
In Pandas, there is a function, By which we can output selective columns only. That function is usecols=M: N, Where M and N can be numeric and alphabetical.
Code:
import pandas as pan

#Storing column A,B,C(First three)columns in dataframe using usecols function
Excel_sheet = pan.read_excel(r'C:UsersACSDocumentsHotel.xlsx',index_col=0,usecols="A:C")

#In place of :- usecols="A:C",  usecols[0,1,2] and usecols=["A,B,C"] can also be used

#Printing Dataframe
print(Excel_sheet)
Output:

For our selective column datasheet, there are many ways of declaration and syntax. But usecols is the vital keyword used for the selection of columns. usecols can be used as usecols="A:D" , usecols=[0,1,...n] or usecols=["A,B,C,.....,n"] etc.
Reading selective rows in Pandas
For Selective rows, We use the keyword nrows = X, Where X is an integer value representing the number of rows required to output.
Code:
import pandas as pan

Excel_sheet = pan.read_excel(r'C:UsersACSDocumentsHotel.xlsx',index_col=0,nrows=5)


print(Excel_sheet)
Output:

However, there is the best method for selective rows by which we can get rows from as well as from the bottom also.
Example of head method in pandas
For that, we use functions .head() and .tail(). .head(N) function outputs the first N rows from starting of the sheet, While .tail(N) gives N rows as output from the end of the sheet.
import pandas as pan         # here pan is alias name we can use any other name also

Excel_sheet = pan.read_excel(r'C:UsersACSDocumentsHotel.xlsx',index_col=0)

print(Excel_sheet.head(7))
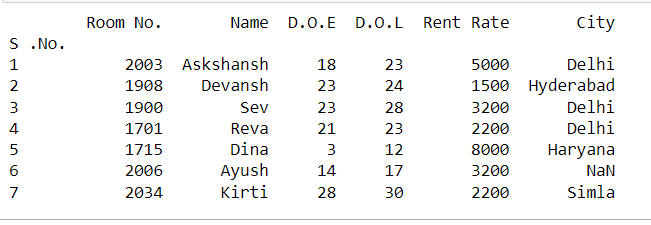
We can see that by using “.head(7)” in the code, We output the first 7 rows from the sheet’s start.
Example of tail method in pandas
import pandas as pan         # here pan is alias name we can use any other name also

Excel_sheet = pan.read_excel(r'C:UsersACSDocumentsHotel.xlsx',index_col=0)


print(Excel_sheet.tail(7))
Output:
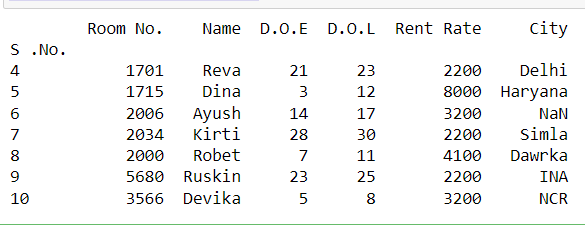
In the code above, We use “.tail(7)”, Which outputs 7 rows(from rows 10 to 4) from the end of the sheet.
Wrapping Up
In this article, we learn how to use Pandas library and its in-built function for reading and manipulation of Excel sheets. There are many keywords like sheet_name, usecols , nrows , index_name, header, concat, Which we used above, and also very vital ones like .head(), and .tail().





Comments are closed.